Showing posts with label Dessert. Show all posts

Sunday, August 11, 2024

Homemade Toaster Pastries (Gilmore Girl Recipe #1)


AKA Poptarts! Let's kick off this Gilmore Girl cooking series with the most iconic recipe of them all. The Poptart! Crunchy Pastry with a Jam filling and a light sprinkled frosting on top. Enjoy this homemade version of this delicious on-the-go breakfast.

Season 7  Episode 3

Lorelai: I opened the little silver wrapper, and I took a bite, and I thought nothing had ever tasted so good. I thought it tasted like freedom. It tasted like I was my own person. The Pop-Tart tasted like freedom and rebellion and independence. 

Makes 6 Pastries 

Ingredients: Preheat oven to 375*

For the Filling: 

1/3 Cup Strawberry Jam

For the Tart:

2 Cups all-purpose flour, plus more as needed

1 Tablespoon Wheat Flour

1 1/2 Sticks Cold Butter, diced

2 Tablespoons Light Brown Sugar

1 Teaspoon salt

3 Tablespoons Sour Cream, divided, plus more as needed

2 Tablespoons Shortening

1/2 Teaspoon Vanilla Extract

1 Large Egg, beaten with about a tablespoon of water, for the egg wash

For the Icing:

2 Tablespoons Milk

1/4 Teaspoon Vanilla Extract

3/4 Cup - 1 Cup of Powdered Sugar Sifted 


Instructions:

To make the tart: add the all-purpose flour, wheat flour, butter, brown sugar, and salt to the bowl or food processor. Mix or pulse until thoroughly combined and the texture is mealy. Add 2 tablespoons of sour cream and mix/pulse a few times. Add 1 more tablespoon of sour cream, the shortening, and vanilla. Mix/pulse until the dough combines and begins to form into a ball. The texture should be smooth, not dry or sticky. The dough should hold its shape when pressed between your fingers. If the dough feels dry, add a tablespoon or two of sour cream.

Form the dough into a disk and refrigerate for 30 minutes.

Remove the dough from the refrigerator. On a lightly floured work surface, roll the dough out to about 1/8 inch thick. Using a cookie cutter or a knife, cut 3x4 1/2 inch rectangles. Gather the scraps and reroll as needed.

On half of the rectangles, spread about 1 tablespoon of jam, leaving the edges exposed. Using a pastry brush, brush egg wash along each edge and top with a second rectangle. Use a fork to crimp the edges together and "dock" the top.

Preheat the oven to 375*F. Arrange the tarts on the prepared sheet tray and refrigerate until the dough is firm, 15 to 20 minutes. 

To make the icing: in a medium bowl, whisk together the milk, vanilla, and powdered sugar to create a thick white glue-like icing. Stir to combine. Add in more powdered sugar or milk as needed to create the appropriate texture.

Bake the tarts: until they are golden brown and cooked throughout, 30 to 40 minutes. Let cool so they are warm but not hot, about 10 minutes. Spoon 1 teaspoon of icing onto the top of each tart. Spread the icing as it begins to drip, keeping it on the pastry. Immediately sprinkle with the sanding sugar, if desired, while the tarts are still warm. Serve warm or at room temperature. Store in airtight containers. Tarts can be reheated in the oven. If not iced. 350* for 5-7 mins


Recipe from: Gilmore Girls The Official Cook Book: By Elena P. Craig & Kristen Mulrooney


Sunday, October 7, 2018

Apple Cider Biscotti


Welcome fall! We have hit fall weather here in WI and the colors are starting to change so why not bring out some fall flavors. I absolutely love Italian desserts and anything I can dip in my tea in the morning is even better.  

This dessert is made with an Allulose Natural Sweetener which has 90% fewer calories than regular granulated sugar! It is not too sweet and has a wonderful light apple cider taste with a delightful apple cider cinnamon frosting. Enjoy the wonderful taste of fall in this amazing treat.

Ingredients: 
Biscotti
1/2 Cup Butter (1 Stick, Room Temperature) 
1 Cup  Keystone Pantry Allulose 
2 Eggs
1/4 Cup Apple Cider
3 1/2 Cups Flour
2 Teaspoons Baking Soda
2 Teaspoons Cinnamon
1/2 Teaspoon Sale

Apple Cider Glaze
1 Cup Powdered Sugar
 2 1/2 Tablespoons Apple Cider
1 Teaspoon Cinnamon

Instructions: 
Biscotti 

Preheat oven to 350*
In a large bowl, mix together butter and sugar until creamy. Add in eggs one at a time until combined. Slowly add in apple cider until it all comes together. In a separate bowl mix together the flour, baking powder, cinnamon, and salt. Mix the dry mixture a little at a time with the wet mixture until combined. If the mixture is sticky add in a little bit of flour at a time until you are able to mold the dough.

Divide the dough in half on a floured surface or parchment paper. Shape each dough into a 12" log roll shape. Place each roll onto a pan with parchment paper at least 3 inches apart and flatten down the log until they are 1/2 inch in height.

Bake for 15-20 minute until they are golden brown. Take out of the oven and let sit until it is cool enough to handle and place onto a cutting board and cut into 1/2 inch slices. Place slices back onto pan and back in the oven for 6 minutes, turn over and bake for another 6 minutes. Take out of oven and place onto the cooling rack and then frost.

Glaze:
Mix together; powdered sugar, apple cider, and cinnamon. Add in a bit more apple cider if you need the glaze a bit thinner. Frost biscotti after they have cooled. 


Friday, March 16, 2018

Apple Scone


Happy St. Patrick's Day!
How about a wonderful, simple breakfast for the morning of? This recipe is so simple and quick to make for a delicious breakfast to go along with that cup of tea. The light taste of apple and a hint of cinnamon will brighten up anyone's day. So when you think of St. Patrick's Day don't just think of corned beef, beer, and potatoes, think of this amazing little breakfast to start your day off perfect.

Ingredients: 
2 3/4 Cups Flour
1 1/4 Teaspoon Baking Powder
3 Tablespoons Butter
3/4 Teaspoon Salt
2/3 Cup Milk
2 1/2 Tablespoons Sugar
1 Egg, beaten
1 Cup grated Apple

Topping
2 Teaspoon Melted Butter
Granulated Sugar

Directions:
Preheat oven to 450*
Butter and flour 9x9 square baking pan
Sift flour, baking powder, and salt into a large bowl.
Blend in room temperature butter and then mix in sugar.
Beat egg into milk and add in grated apples. Mix gently into flour mixture until fully mixed. 
Spread dough onto your greased 9x9 pan and bake for 25-30 minutes. 
Place onto a cutting board and spread melted butter on top and sprinkle as much sugar as you please 
Cut into 9 sections and serve warm

Directions from irish-expressions.com


Friday, December 15, 2017

Soft Sugar Cookies with Cream Cheese Frosting


Has it really been since October since I last posted anything? I will make a post about that later but for now, I have to share with you the best soft sugar cookies you could ever make or share. If you love the Walmart soft sugar cookies that take over everyone's homes during any holiday then you will for sure love these. They are soft and the cream cheese frosting goes along perfect. 

Cookies
2 1/4 Cup Flour
3/4 Cup Cornstarch
1/2 Teaspoon Salt
2 Teaspoons Baking Powder
1 Cup Butter. Room Temp
1 Cup Sugar
1 Egg
1 Teaspoon Vanilla

Cream Cheese Frosting
4 ounces cream cheese, room temp
4 Tablespoons Butter
1 Teaspoon Vanilla
2 Cups Powdered Sugar
Optional: Food Coloring and Sprinkles

Instructions
Cookies:
Preheat oven to 350.
In bowl mix together butter and sugar until it is light and fluffy. Add the egg and vanilla and mix well. 
In a separate bowl lightly mix together flour, cornstarch, salt, and baking powder. Slowly add this mix to the sugar mixture slowly. The mixture will be crumbly. 
Knead the cookie mixture well until it all comes together. Place flour onto your countertop and roll dough up to 1/4 inch thick. Cut into round shapes, I used a 2-inch diameter. 
Place cookies 2 inches apart on sheet and bake for 8 minutes.
Transfer to cookie rack, cool and frost. 

Cream Cheese Frosting
In medium bowl mix butter, cream cheese, and vanilla until smooth. Add in powdered sugar a little at a time until well combined. Add your coloring and decorate.

Recipe adapted by


Monday, October 2, 2017

Coconut Vanilla Chia Pudding


You will forget you are eating vegan with this delicious coconut vanilla chia pudding! I have been having quite an obsession with chia seeds lately and this dessert right here is so smooth, creamy, and just sweet enough and it perfectly pairs with fresh fruit! 

Ingredients:
1 Cup Full Fat Coconut Milk (just the cream on top)
1/4 Cup Coconut Water (fresh from coconut is best) 
3 Teaspoons Honey
1Teaspoon Vanilla
2 Tablespoons Chia seeds 

Directions:
Place all ingredients into a bowl and whisk until smoothly combined. 
Place into fridge overnight or up to 6 hours (to let the chia seeds soften) 
Serve with fresh fruit and enjoy! 

Recipe Adapted by


Wednesday, August 16, 2017

Strawberry Cheesecake Ice Cream


Homemade Ice Cream is my all time favorite thing and even better when it is a no churn. Make it and freeze it over night and dig in for a snack the next day. This is my all time favorite ice cream to make mostly because I am one of the only ones in my house that love fruit flavored ice cream, everyone else likes chocolate so I actually make this for myself. 
This Ice Cream is creamy, full of cream cheese chunks, strawberries, and crunchy graham crackers. It tastes like eating an actually strawberry cheesecake just in ice cream form.

Ingredients: 
2 Cups Heavy Cream
1 (14 oz) Sweetened Condensed Milk
2 Teaspoons Vanilla
1 8 oz cream cheese (soft)
Strawberry Pie Mix (Can)
10 Golden Oreos (crushed) 

Directions:
Mix cream cheese in small bowl until soft and fluffy and set aside. Wisk together heavy cream and milk until it is thick and with stiff peaks (like whipped cream) then stir in cream cheese (you  might have lumps and that is okay)
Fold in crushed Oreos,  strawberry pie mix, and vanilla. Place into a container and set for 6 hours or over night.


Saturday, June 24, 2017

Kit Kat Carmel Ice Cream


Summer is here! Except in Wisconsin, this weekend is going to be high on 61! It is also the time of year my kid beg for homemade ice cream. This is my all time favorite recipe for ice cream, it is super simple so if you do not have a machine, no worries! You are able to just stick it in the freezer for 5 hours or overnight and it will freeze perfectly for you. 

Ingredients: 
2 Cups Heavy Cream
1 (14 oz) Sweetened Condensed Milk
2 Teaspoons Vanilla
4 Kit Kat Bars
1/2 Cup Carmel Sauce

Directions: 
Whip cream by hand or mixer until you have soft peaks and stir in milk and vanilla.
Place in ice cream maker or in freezer, take out when it feels like soft serve
Place three Kit Kat's into a food processor until they are crumbs and cut the fourth into chunks. 
Mix Kit Kat crumbs and chunks into soft ice cream and swirl in Carmel.
Finish freezing and enjoy!


Sunday, June 4, 2017

Oreo Fudge Cake


The birthday season in my household is here and to start it all off my middle girl Anna who just turned nine requested an Oreo cake so tis I did and let me tell you this cake was a huge hit. My all time favorite super moist chocolate cake, with a delectable fudge topping. You might never want to make another kind of choclate cake agin.

Ingredients:

Cake: 
1 1/2 cups all-purpose flour1 1/2 cups granulated sugar
1 1/4 cup unsweetened cocoa powder
1 1/2 teaspoons baking soda
1 1/2 teaspoons baking powder
1 teaspoon salt
2 eggs, at room temperature*
3/4 cup buttermilk
1/2 cup canola oil
2 tablespoon Mayo
1 tablespoon vanilla extract
3/4 cup strong brewed coffee, hot
2/3 cup semi-sweet chocolate chips 

Frosting:
2 sticks of butter (soft)
1 Cup Shortening 
5 Cups Powdered Sugar
2 Tablespoons Heavy Cream
2 Teaspoons Vanilla
15 Oreo Cookies (crumbed) 

Directions:

Cake:
 Preheat the oven to 350 degrees F. Grease 2 8-inch round cake pans. Butter all around and cover with cocoa powder

In a medium size bowl combine the flour, sugar, unsweetened cocoa powder, baking soda, baking powder and salt. Set aside.
In the bowl of a stand mixer (or use a hand held mixer) beat together the eggs, buttermilk, mayo, canola oil and vanilla until smooth.
 Add the dry ingredients to the wet ingredients with the mixer on low until there are no longer any clumps of flour. Add the hot coffee and mix until combined. Stir in the chocolate chips
Pour the batter among the 2 cake pans and bake 20 to 25 minutes, until tooth pick comes out clean. Remove and let cool five minutes and take cakes out of pans, let the cakes cool completely before frosting. 

Frosting: 
Stir butter and shortening in bowl until fluffy. Mix in the powdered sugar until fully mixed. Stir in vanilla and cream. Fold in your oreo crumbs and frost your cake when it is cooled.

Fudge: I just bought fudge ice cream topping. Take 1 cup of fudge topping and mix in 1 Tablespoon of water to help thin it out. Pour and spread over the top of the cake. 


My now 9 year old!


Friday, March 24, 2017

No Bake Snickers Cheesecake


Cheesecake goes really fast in this house because it is everybody's favorite. I always have stuck with the good ol fashioned New York Style Cheesecake well because it is the best, so I was always afraid to play around with it and make anything else. Well I was in the mood for something a little sweet this week and  I thought why no a cheesecake? Well I wasn't in the mood for spending hours and making my cheesecake and I grew up with a no bake cheesecake covered with cherries. So I decided to make a spin on it and try something else. This cheesecake is thick, creamy, chocolaty, and full of snickers! This may be my new favorite no bake version of a cheesecake. 

Ingredients: 

1 1/2 Cups Graham Cracker Crumbs
4 Tablespoons Butter (melter)
24 OZ Cream Cheese (3 blocks)
2 Cups Powdered Sugar
5 Tablespoons Unsweetened Cocoa Powder
2 Cups Cool Whip
4 Snicker Bars
Optional: Caramel Sauce

Directions: 

Combine cracker crumbs and melted butter in bowl. Press crumbs at the bottom of a 9-inch spring-form pan or 9-inch pie pan.

Beat cream cheese until smooth, slowly add in sugar and cocoa and beat until incorporated. 
Fold in cool whip with spatula until there is no more white.
Chop up 3 snicker bars and and fold into batter.
Pour cake into pan and spread until even. Place into fridge overnight.
Garnish with extra cool whip and chopped up snicker bar. Add on caramel after slice is on plate.

Recipe Adapted from


Friday, March 3, 2017

Dirt Cake Cupcake


Guess who got a new oven? ME! As I stated in a post before the mystery still remains of how my old oven glass door got shattered but as a wonderful result I got my new oven on Wednesday and I couldn't be anymore in love. So break it in I had to see how well it did with baking cupcakes and let me tell you it did an amazing job. As for these cupcakes they are fluffy with superb texture and the perfect chocolate taste that will make this your new favorite chocolate cake recipe. The frosting is great because it is not overly sweet, it is light and fluffy. The frosting will make extra enough for you to put in some glasses and eat as an oreo pudding, your kids will love you a little extra for two desserts!

Makes 24

Ingredients: 

FROSTING:
2 Small boxes chocolate instant pudding
2 sleeves of Oreos (smashed)
3 Cups Milk
8 oz Cool Whip
1/4 Cup Powdered Sugar

CAKE:
1/2 Cup Butter (room temp)
1/4 Canola Oil
1 2/3 Cup Sugar
1 Cup Cocoa powder
1/3 Cup Chocolate syrup
1/2 Teaspoon Salt
3 Eggs
1/2 Cup Hot Coffee
1 3/4 Cup Flour
1 Teaspoon Baking Soda
1/2 Teaspoon Baking Powder
3/4 Cup Milk

Directions: 

CAKE: 
Preheat oven to 350*
In a mixing bowl cream together butter, oil, and sugar; add in your cocoa powder and mix well. Add syrup, salt and eggs mix until combined; pour in hot coffee and mix well. In a separate bowl place flour, baking soda, and baking powder and sift. Place flour mixture into the chocolate min and mix until well combined. Slowly stir in the milk until creamy.

Place an ice cream scoop into your cupcake tin and bake for 20-25 minutes or until toothpick comes out clean. Cool on rack for 30 minutes before frosting.

FROSTING: 
In a mixing bowl place in powdered sugar, pudding mix and milk and whisk until thick. Fold in cool whip and mix in half of your cookie crumbs as well. Chill for 30 minutes and frost when cupcakes are completely cooled. Top the cupcakes off with the rest of the crushed Oreos. 


Saturday, February 18, 2017

Easy Chocolate Mousse


Have you ever just had a string of bad luck? The last few weeks have been full of them. I am finally getting rid of a horribly cold that lasted three weeks, my slow cooker actually blew up with with black smoke and everything, my food processor went to crud and I woke up in the middle of the night to find black glass all over my kitchen floor from my oven; so for now I am out of a few cooking tools. 

So for Valentine's day it was hard since I have certain things I make every year. I made steak on the stove, twice baked potatoes out of the microwave, and since I couldn't make my strawberry chocolate heart cheesecakes I made this delicious chocolate mousse that actually turned out to be a huge hit. 

It is simple, creamy, just enough sweetness and chocolate to help your craving. This filled 5 large glasses or you could even put this into a pie if you would like. No matter how you eat it, you will enjoy every bite.

Ingredients:

2 Eggs
1/4 Cup Sugar 
2 1/2 Cups Heavy Whipping Cream (Divided)
1 Cup Semi-Sweet Chocolate Chips

Instructions:

Beat eggs and sugar for three minutes
Next heat one cup of Heavy Whipping Cream in a small saucepan until hot but do not boil. Mix the hot heavy cream slow and low into the egg mixture until combined.
Place the egg mixture back into saucepan over low heat for five minutes or until thickened, do not boil
Remove from heat into bowl, stir in chocolate until melted and combined. Cover and place into fridge for two hours.
Take your whisk attachment and whip your remaining heavy cream until it reached stiff peaks. Take chilled and firm chocolate from fridge and fold your fresh whipping cream into chocolate mixture until smooth. 

Optional: Top with whipped cream and chocolate shavings

Recipe by


Thursday, February 2, 2017

PMS Cookies


These are simple, salty, chocolatey, peanut-buttery and full of marshmallow fluff; if this doesn't set your cravings I don't know what will! If you don't know I have three daughters only one is almost at that age but the P word so I know I will be making these a lot more often later and make a fun little tradition, you need to have fun with it right? So the next time you are craving something or if you just want to be nice to the rest of your family and share with them. These are wonderful non-baking sweets that will go fast.

Ingredients: 
1 Cup Creamy Peanut butter
1 Cup Marshmallow fluff 
2 sleeves of Ritz Crackers
2 Bags of Chocolate Chips, 12 oz each

Instructions: 
Spread peanut butter and fluff onto a cracker and place another cracker on top to turn it into a sandwich. Place them onto a pan with wax paper.  Melt your chocolate in a double boiler and place each cracker sandwich into chocolate, take out and place back onto wax paper. Let cool to room temp or set into freezer for 15 minutes.

Recipe adapted from 


Friday, January 6, 2017

Buckeyes


It is a little past Christmas but I was meaning to make these before but with life, I got a little too busy and ended up not being able to make them. I had everything in my cabinet and since the weekend is here and 3 kids asking what is for a snack all the time. I decided to get a foot up and make them before they asked. This recipe is easy and fast to make. If you love peanut butter and chocolate then you know for sure you will love these.

Ingredients:

12 oz Peanut Butter
1 stick of butter *soft*
1 Teaspoon Vanilla
3 1/2 Cups Powdered Sugar
1 Bag (16oz) Chocolate Chips

Instructions: 
Mix butter and peanut butter together in a bowl, stir in vanilla, mix in powdered sugar until smooth. Roll into 1 inch balls (makes about 40) and place onto a parchment covered cookie sheet and place into the freezer for an hour. 
When frozen; melt chocolate and dip peanut butter balls half way and place back onto parchment paper. Let rest for 10 minutes and enjoy!

Recipe by


Thursday, October 13, 2016

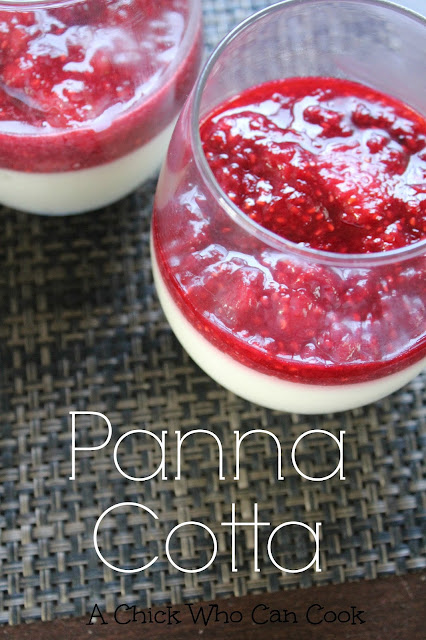
Panna Cotta


A creamy gelatin dessert topped off with berries, you cannot turn this down. Don't let this fool you if you have never had it before it is one of the most amazing dessert you will ever have. It is creamy, just a touch of sweetness and the berries just top it off with this perfect taste. You can make this for yourself, a dinner party with the boss or even on Thanksgiving or Christmas. Enjoy the taste of Italy in your home with simple ingredients that you already have.

Ingredients:
1 Cup Whole Milk
1 Packet Unflavored Gelatin 
2 Cups Heavy Whipping Cream
1/2 Cup Sugar
Pinch of Salt
1 Teaspoon Vanilla
1 Cup Sour Cream

Berry Topping:
2 Cups Berries of your choosing ( I did strawberries and raspberries)
4 Tablespoons Sugar
1/2 Teaspoon Lemon Juice

Instructions:
Off the heat, place 1 cup of milk and gelatin into a pan and let sit for 5 minutes to let the gelatin soften. Place pan over medium heat and stir until gelatin until it dissolves, do not let mixture boil.

Add in the 2 cups of heavy cream, 1/2 cup of sugar, 1 teaspoon of vanilla and the pinch of salt. Keep stirring until the sugar is dissolved and again do not let mixture boil.

Remove from heat and let sit to cool for 5-10 minutes. 

Place Sour Cream into a separate bowl and whisk until smooth. While whisking slowly pour your cool mixture into the sour cream. Once the mixture is smooth place into 6 glasses or jars. Place into fridge for 6 hours or over night. 

Berry Sauce:
In a small sauce pan combine 1 Cup of the berries, 1/2 Teaspoon Lemon Juice and 4 Tablespoons of Sugar. Bring to a low boil and cook for 5 minutes or until it looks like syrup.
Take off heat and stir in remaining berries, when the sauce reaches room temp, spoon over the cooled Panna Cotta.